Make App Store screenshots with AI, straight from the Simulator
Let Codex or Claude Code run your app in the iOS Simulator, capture the real screens, and render a finished App Store set at Apple's exact sizes. One prompt, no Canva.
·4 min read
On this page
Your App Store screenshots are an ad, not a tour of your app. Apple says your first one to three screenshots show up right in search results when you don't have a preview video, so most people decide from those without ever opening your page.
The old way to make them with AI was to generate pretty frames in ChatGPT, then fix the blurry app text by hand in Canva. Now an AI coding agent can open your app in the iOS Simulator, take the real screenshots itself, and build the finished frames in code at Apple's exact sizes.
This guide is one prompt for that, and the checks to run before you upload.
The short version
Use Codex (OpenAI's coding agent, which comes with a ChatGPT plan) or Claude Code. Give it your project and the prompt below.
It captures your real screens from the Simulator, plans the set with you, and renders every frame in code. Your app's text stays sharp because it's never redrawn.
One benefit per frame, the strongest first, six words or fewer per headline. No prices and no "free."
What it looks like
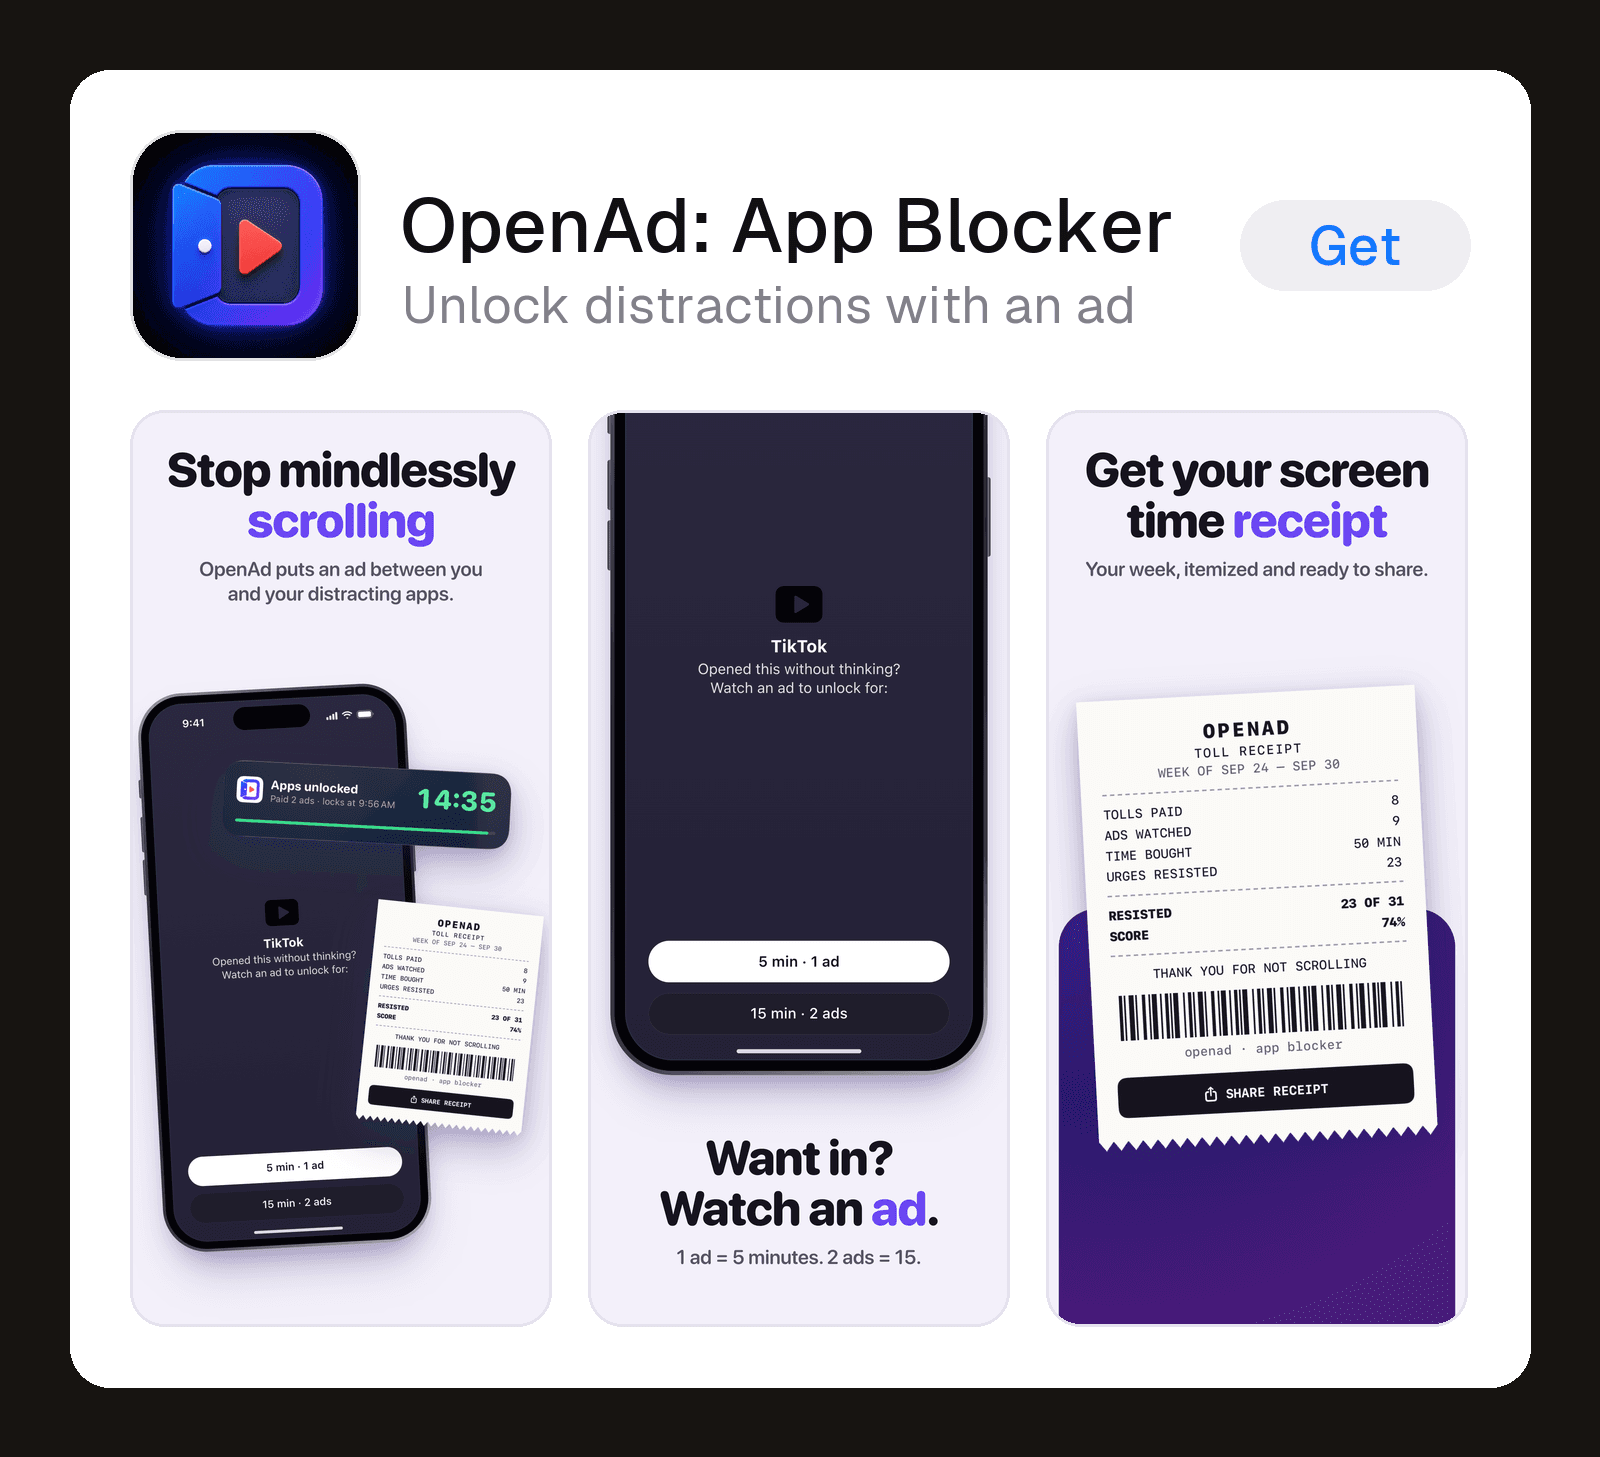
These are OpenAd's screenshots, live on the App Store right now, made this way. Here's the top of the listing as it shows in search:
And the whole set:
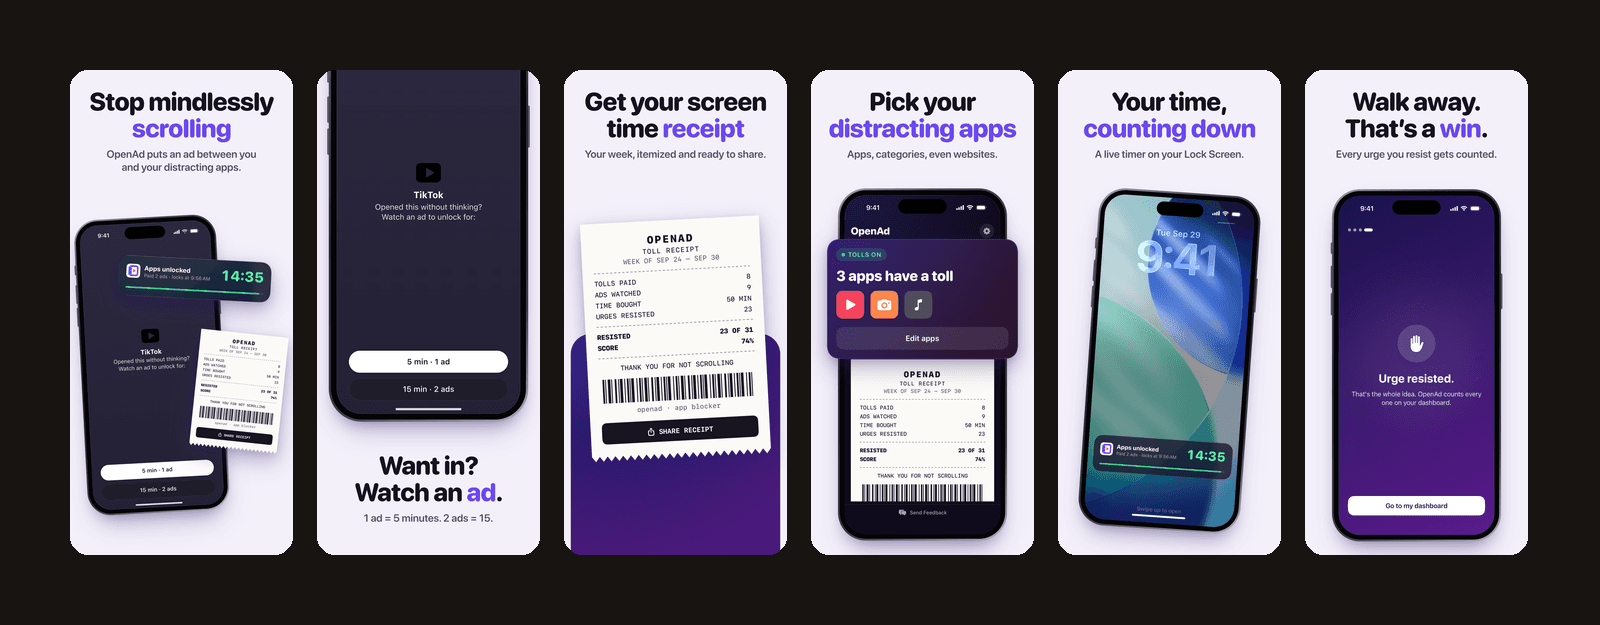
Every phone shows a real capture from the Simulator. The receipt and the timer are cut out of real captures too, with two small text fixes on the Lock Screen. One screen had to be drawn: the Simulator can't show the Screen Time block screen, so the agent rebuilt it from the app's own text.
What you need
- A Mac with Xcode and your app's project on it.
- A coding agent that can run commands on that Mac. Codex or Claude Code both work. Open it in your project folder.
- An hour or so, most of it spent reading the plan and saying what to change.
Plan the frames first
Decide what the set has to say before anything gets made. The prompt asks the agent to plan with you, but these are the rules it should follow:
- Frame 1 sells the reason to download. For OpenAd that's the mechanic itself: an ad between you and the app you're about to open. Not your logo, not a welcome screen.
- One benefit per frame, most persuasive first. Three to six frames is plenty.
- Headlines of six words or fewer, plus one short line under them at most.
- No prices, no "free," no "no subscription." Apple's guideline 2.3.7 says screenshots "should not include prices." Lead with what the app does instead.
- Show the app being used. Guideline 2.3.3 says screenshots should show the app in use, "not merely the title art, login page, or splash screen."
The prompt
Paste this into Codex or Claude Code from your project folder. Swap the three [BRACKETS] first.
Make my App Store screenshots. You can use this Mac: build my app for the iOS Simulator, capture real screens, and render the final images in code.

My app: [WHAT IT DOES, ONE LINE]
Who it's for: [WHO IT'S FOR]
The main reason to download it: [YOUR HOOK]

1. Find the screens. Read the project and list the 5 to 8 screens that best show what the app does. If a screen needs sample data or a launch flag to look right, tell me what you'd add before you change any code.

2. Capture them. Boot the newest Pro Max iPhone simulator. Set a clean status bar first:
xcrun simctl status_bar booted override --time 9:41 --batteryState charged --batteryLevel 100
Open each screen and save it with: xcrun simctl io booted screenshot <name>.png
Tell me which screens the Simulator can't show, so I can send you a screenshot from my phone.

3. Plan the set. 5 or 6 frames, ordered like a sales pitch: frame 1 sells the main reason to download, then one benefit per frame. Headlines of 6 words or fewer, with one short line under them at most. No prices, no "free", no pricing words at all. Show me the plan and wait for my OK.

4. Render. Build each frame in HTML using my app's own colors and fonts: one background, one type style and one accent color across the whole set. Put the real captures inside a phone frame. Never redraw or retype my app's UI. Export each frame as a PNG at 1320 x 2868 and at 1206 x 2622, RGB, no transparency. Save the render script in the repo so I can run it again later.

5. Check. Make one image of frames 1 to 3 side by side at the size App Store search shows them, and one sheet of the whole set. Show me both.
How to use it
- Answer its questions. It will ask before adding sample data or a launch flag. Say yes if the screen looks empty without it.
- Fix the plan, not the pixels. Rewrite headlines and reorder frames while it's still text. Changing a plan takes a sentence; changing a finished frame takes a render.
- Judge frames 1 to 3 in the search preview. That's the size most people see. If you have to squint to read a headline, ask for it bigger and shorter.
- Change things in words. "Tilt the phone on frame 1 a little," "make the accent our purple," "swap frames 2 and 4." Because the frames are code, it changes exactly that and nothing else.
- Upload. Apple takes up to 10 per device size. Check Apple's size list before you upload, because the required size changes with new iPhones. The prompt makes both the medium and the large iPhone size, so you're covered either way.
What the Simulator can't capture
Some screens only exist on a real phone: a Screen Time block screen, Apple Pay, the camera, anything from another app. You have two options:
- Screenshot it on your phone and drop the PNG in your project folder. Tell the agent where it is.
- Let it rebuild the screen from your app's own text and colors, like OpenAd's block screen. Only do this for a screen your app really shows, and ask it to match the real one exactly.
Check before you upload
- Every frame has the same background, type and accent. Mixed styles make an app look buggy.
- Every phone shows a real screen from the version you're submitting.
- No headline mentions a price or "free."
- Frames 1 to 3 each make sense in under two seconds at search size.
- Files are PNG or JPEG, RGB, no transparency, at the exact size.
Keep the render script. Next release, you ask for new captures and run it again, and the whole set updates in minutes.
Get better at growing apps.
New case studies and guides on how apps grow. Free, straight to your inbox.
Written by Matt Neves
I study how apps grow and break down the case studies for 20,000+ app builders as @agenticmatt. I test what I learn on my own apps.
More about meKeep reading
Acquisition · 21 min read
App marketing channels, ranked for a new app with no budget
A tier list of the ways to get your first app users for free: when each channel is worth your weeks, when it isn't, and how to start. Plus what to add once you have money.
Acquisition · 2 min read
Get your app recommended by AI (AI SEO)
A 3-step prompt process to find out why ChatGPT, Claude, Grok and Perplexity aren’t recommending your app, and exactly how to fix it.
Acquisition · 2 min read
Find your first users with AI
Your first users are already posting about the problem your app solves. An AI research prompt that finds those threads and groups, and how to show up without spamming.